How to bring modern development best practices to WordPress

The challenge
WordPress is popular for a number of reasons. It is extendable, has a familiar and intuitive user interface, has good user (and developer) documentation, is reliably backward compatible, has solid core CMS features, and supports a huge ecosystem of plugins and tools.
But here’s the rub — WordPress is old and can be a bit of a curmudgeon. Technology and development practices have changed quite a bit over the years, and WordPress hasn’t quite kept up. In many ways, it has refused to change.
Its intentions are good. WordPress has a core commitment to backward compatibility, so it doesn’t haplessly break any of a zillion plugins or themes that thousands of site owners rely on every day. That benefit to owners, however, comes at a cost to developers, namely, working on a codebase that just doesn’t fit the paradigm developers love today.
The good news is, not all hope is lost! Brilliant and dedicated people have been developing tools and frameworks to bring modern development best practices (and quite frankly, joy) to WordPress developers, allowing us to have the best of both worlds.
Modern development standards
There are some standards from the software industry that we like to follow here at Pixo. Our goal is to apply these same standards to our WordPress work whenever possible.
Clean code
Clean code is not a standard, per se, but a popular philosophy or school of thought for building maintainable software. At its core are rules about keeping methods small and well-named so that your code is readable and easy to understand.
12 factor app
The 12 Factor App is a methodology for creating a software application that is portable, reliable, and easier to maintain.
DRY
DRY stands for Don’t-Repeat-Yourself, which is a principle that encourages writing code that is more reusable.
Atomic design
This is a methodology of front-end design in which your web pages are broken up into template “patterns” that are organized for better reusability. A set of small “atoms” make up a set of larger “molecules,” which make up a set of larger “organisms,” which make up a page. You can learn more about it on creator Brad Frost’s website.
MVC
MVC stands for Model-View-Controller and is a popular standard for organizing your code by separating “concerns” into these three areas.
- Controller: Fetch the data
- Model: Format or shape the data
- View: Display the data
Now let’s introduce you to the frameworks and tools that will help us better embrace these practices.
Bedrock: A good foundation
The aptly named Bedrock project is the foundation for moving our WordPress projects closer to our desired state. Bedrock is a project of the Roots initiative, which is a set of open-source projects for WordPress, supported by a number of heavy hitters in the industry.
At its core, Bedrock is a Composer-based WordPress boilerplate with a flexible configuration management layer.
Let’s examine each of these areas and start with how Bedrock handles dependency management.
Dependency management
Standard WordPress has no dependency management system — at least not a robust developer-centric one. Typically, the only dependencies a WordPress project has are plugins, and these are either installed and managed through the administrative interface or with the wp-cli tool.
The closest we got to managing dependencies with wp-cli was a wp plugin command that let us install and update plugins.
wp plugin install redirection   # Install a plugin and commit the cod

wp plugin update redirection    # Update a plugin
More about Bedrock
Composer
Modern PHP applications today use Composer for dependency management. Bedrock brings Composer to WordPress through a reorganization of some core WordPress files so that even WordPress itself is a dependency!
With Bedrock you can now manage all of your dependencies using all of the robust features that Composer provides.
# Create a new Bedrock project

$ composer create-project roots/bedrock


# Add plugins with Composer

$ composer require wpackagist-plugin/redirection

$ composer require wpackagist-plugin/simple-page-ordering


# Update WordPress to a specific version

$ composer require roots/wordpress:5.8
Bedrock's configuration management
Composer lets us do way more than install and update plugins:
- We can define development-environment-only dependencies separate from those needed for production environments.
- We can more easily see a history of version changes across all our dependencies.
- We can load PHP packages outside of the WordPress ecosystem.
- We can take advantage of autoloading dependencies.
- We can more easily handle dependencies in our continuous integration tools.
It is difficult to imagine going back after moving to a Composer-based model. Bedrock gives us our first big win by raising the bar in dependency management (as suggested by the 12 Factors).
Configuration management
The other primary feature Bedrock provides is a robust and modern configuration management system. Again, standard WordPress offers nothing in the way of configuration management between environments. In the past, the best we could do was to add some PHP code to the wp-config. php file that would look something like this.
/*

* /wp-config.php

*/

if (file_exists(dirname(__FILE__) . '/wp-config-local.php'))

        require_once(dirname(__FILE__) . '/wp-config-local.php');

/**

* /wp-config-local.php

*/

define('DB_NAME', 'wordpress');

define('DB_USER', 'wordpress');

define('DB_PASSWORD', 'wordpress');

define('DB_HOST', 'mariadb');


define('AUTH_KEY', 'fill-in');

define('SECURE_AUTH_KEY', 'fill-in');

define('LOGGED_IN_KEY', 'fill-in');

define('NONCE_KEY', 'fill-in');

...


define('WP_DEBUG', true);

define('WP_DEBUG_DISPLAY', true);

define('DISALLOW_FILE_MODS', true);
Bedrock meets modern standards
With Bedrock you will never touch the wp-config. php file ever again. All of your configuration is managed with both environment specific configs and a localized .env file which is the standard for modern application development.
Environment variables
Here is how environment variables now work in your Bedrock WordPress project. Your .env configuration file is placed in the root directory of the project and will look something like this:
# /.env


# PROJECT SETTINGS

PROJECT_NAME=example

PROJECT_TITLE="Example Project"

PROJECT_BASE_URL=example.localhost

# DATABASE CREDENTIALS

DB_NAME=wordpress

DB_USER=wordpress

DB_PASSWORD=wordpress

DB_HOST=mariadb

# Environment

WP_ENV=development

WP_HOME=http://${PROJECT_BASE_URL}

WP_SITEURL=${WP_HOME}/wp

# SECURITY HASHES

AUTH_KEY='fill-in'

SECURE_AUTH_KEY='fill-in'

LOGGED_IN_KEY='fill-in'

...

# LICENSE KEYS

ACF_PRO_KEY='fill-in'

GRAVITY_FORMS_KEY='fill-in'
Configuration in the code base
The Bedrock system is set up to read this .env file, which is clean and easy to read. As an added bonus, you can include other environment variables in here that can be used by other systems. For example, we use Docker Compose for our local development environments and include Docker variables such as PHP version tags.
Environment configuration
Whereas environment variables are hyper-local and never added to the codebase, some configuration can be defined in the code base.
As an example, WordPress has many configuration options that can be enabled for local development, but that would not be appropriate for your application in production. Bedrock’s “config” directory supports multiple configuration files that can be set in your .env file (Example: WP_ENV=development) to standardize your environments.
Here is an example configuration file using a common set of settings for our local development environments in which we enable debug mode and display errors to the screen.
Application directory structure
With Bedrock’s configuration management tools, we are now practicing 12 Factor App factor #3 and managing configuration in a more manageable and robust way.
Application directory structure
In addition to better configuration management and dependency solutions, Bedrock gives us a directory structure that is more flexible and matches other modern frameworks.
The standard WordPress project does not have a separate web directory; therefore, the root project directory and the root web directory are the same.
Here is how our WordPress directory structure looks now:
/project

├── config/

│   ├── environments/

│   │   ├── development.php

│   │   ├── staging.php

│   │   └── production.php

│   └── application.php      # Primary wp-config.php

├── vendor/                  # Composer dependencies

└── web/                     # Virtual host document root

    ├── app/                 # WordPress content directory

    │   ├── mu-plugins/

    │   ├── plugins/

    │   ├── themes/custom/   # Primary custom application code

    │   └── uploads/

    └── wp/                  # WordPress core
Benefits of the new structure
The new structure gives us a few benefits.
Security
Documentation or configuration stored in a directory accessible to the web server gives an opportunity for a third party to learn information that may be valuable for an attack. The new structure places our configuration, documentation, and potentially server configuration files outside of our application codebase (web/), but they can still be managed in our code repository.
Cleaner organization
Dependencies and configuration are now separated from directories that have the majority of our custom code. This makes our continuous integration build scripts and our IDEs cleaner as well.
Timber: Our MVC hero
The Timber project is an open-source library that was started by the good folks at Upstatement. This library brings Twig templating to WordPress themes. However, the best part is that Timber gives us tools and methods for shaping our data, giving us a powerful way to supply data and logic separate from our template in a way that is easily reusable. This is the foundation for our MVC setup in WordPress.
This cleans up your theme code so your PHP file can focus on supplying the data and logic, while your twig file can focus 100% on the display and HTML. — Upstatement on Timber
Viewmodel
First, we collect our field data and format it to create our viewmodel.
title = $post->title;

        $date = new \DateTime($post->post_date);

        $viewModel->publicationDate = $date->format('F d, Y');

        $viewModel->introduction = get_field('introduction');


        return $viewModel;

    }

}
What this code does
This code does the following:
- Creates an empty article object.
- Adds the post title to the object.
- Creates a formattable date object from the article date field.
- Format the date and add to the article object.
- Adds the introduction text to the article object from an ACF field.
Next, we create our view or template using Twig.
{# pages/news-article.twig #}

{% extends "templates/base.twig" %}


{% block content %}


          {{ post.title }}


          {{ post.publicationDate }}


        {% if post.introduction %}


          {{ post.introduction }}


        {% endif %}


          {{ post.body }}


{% endblock %
Hooking it all up
The variables in this Twig template will be fed by the data from our viewmodel.
Finally, let’s hook it all up with our controller. When someone visits the news article page, the controller will grab the data from our viewmodel, load the data into our template, and render it on the page.
Here is what our controller looks like:
Three files, three purposes
The controller code is called from the standard WordPress template for each custom post type, which, in this case, is a single news article (single-news.php).
At this point, we have three separate files doing three distinct things. The code is cleaner and more descriptive because of the separation.
Compare this to the traditional way we would create this page in WordPress:
*/

* single-news.php

*/


    format('F d, Y');

    ?>


    ' . get_field('introduction') . '';

        }

    ?>
Benefits of using our viewmodel
At first, this template doesn’t look too bad. However, as soon as you start adding any sort of logic, our markup gets complicated very quickly. In this case, just adding an if statement forces us to use concatenation to create our HTML markup. You can imagine if we needed to add a for loop or other complex logic.
The other thing you will notice is that since our viewmodel is a method we can use it for any other template we need, which keeps our code more reusable and DRY.
Atomic Design
Now that we have pulled out the templates from monolithic WordPress template files, we are free to organize our templates using Twig’s elegant include and extend methods. This allows us to organize our templates in a way that supports Atomic Design methodology.
Atomic design helps us keep our templates DRY by creating patterns that are independent and reusable. At Pixo, we organize these templates in such a way that we can attach our CSS styles to them. This helps developers find the related CSS (or, in our case, Stylus) to each template.
Here is an example of how a template directory might look.
#/web/app/themes/custom/patterns

├── bits

│   └── button

│       ├── button.config.js

│       ├── button.styl

│       └── button.twig

├── components

│   └── image

│       ├── image.config.js

│       ├── image.styl

│       └── image.twig

│   └── text

│       ├── text.config.js

│       ├── text.styl

│       └── text.twig

├── pages

│   ├── landing

│   |   ├── landing.config.js

│   │   ├── landing.styl

│   │   └── landing.twig

├── partials

│   └── news-card

│       ├── news-card.config.js

│       ├── news-card.styl

│       └── news-card.twig

└── templates

│   └── base

│       ├── base.config.js

│       ├── base.styl

│       └── base.twig/
Integrating with tools like Fractal
You may notice each directory has a config.js file as well. These are configuration files that support the creation of a pattern library with Fractal. Since we have clean, PHP-free, Twig-only templates, we now have the opportunity to use a tool such as Fractal to build out a pattern library of all of our template patterns with very little work.
Lumberjack
Up to this point, we have made a huge change to how we create a custom WordPress website. Bedrock has reorganized WordPress to allow for better dependency and configuration management, and Timber has transformed the way we create our theme templates.
Enter Lumberjack.
What's Lumberjack for?
Lumberjack is another framework that, like Timber, extends the capability of our WordPress custom theme. However, the capabilities it brings are not just limited to theming. Rather than being plugin-based this framework turns your custom theme into a super-charged framework for WordPress development.
Although Lumberjack can be a stand-alone library, the creators suggest it be used with Bedrock. Also, Timber is a dependency, so if you set up Lumberjack as recommended, you will have all the other functionality we have discussed up to this point installed.
Here are some of the other things that the Lumberjack framework supports:
- Creating/registering post-type objects
- WP Query builder
- Registering menus
- Defining custom routes
Let’s start with how Lumberjack helps with custom post types.
Registering a custom post type
The standard way of registering a custom post type is not complicated. You can add some code to your plugin or theme functions.php file that looks like this.
The way we used to do it:
/** functions.php **/

function create_posttype() {

    register_post_type( 'profile',

        array(

            'labels' => array(

                'name' => __( 'Profile' ),

                'singular_name' => __( 'Profile' )

            ),

            'public' => true,

            'has_archive' => true,

            'rewrite' => array('slug' => 'profile'),

            'show_in_rest' => true,

        )

    );

}

add_action( 'init', 'create_posttype' );
With Lumberjack...
With Lumberjack it looks something like this:
/** app/PostTypes/Profile.php **/


namespace App\PostTypes;


use Rareloop\Lumberjack\Post;


class Profile extends Post

{

    public static function getPostType()

    {

        return 'Profile';

    }

    protected static function getPostTypeConfig()

    {

        return [

            'labels' => [

                'name' => __('Profile'),

                'singular_name' => __('Profile'),

                'add_new_item' => __('Add New Profile'),

            ],

            'public' => true,

            'rewrite' => array('slug' => 'profile'),

        ];

    }

}


/** config/posttypes.php **/

return [

    'register' => [

        App\PostTypes\Profile::class,

    ],

];/
More about Lumberjack
At first glance, this looks pretty similar to the traditional method. You define an associative array with the post-type configuration options defined. However, if you look closer, you’ll see that we now have a separate file for this post type. That is a big win right there because the code becomes easier to find or discover. You’ll notice that this file is called Profile.php and is in a directory called PostTypes. I can now search in my IDE for the very human-sounding “post-type profile,” and it should come to the top of the list. This is another win for Clean Code by making your code easier to read, understand, and discover.
The other thing you will notice is that this custom post type is defined as a PHP object. Also, this Profile class extends another class called Post, which means we can take advantage of inheritance to make our code more DRY.
Query builder
Listing things, like a list of recent blog posts, is a common part of most website projects. Lumberjack comes with a query builder that makes it easier, faster, and more enjoyable to work with the WP_Query functionality.
Here is an example of the traditional way to build a query for a list of projects listed alphabetically by title:
/* How we used to do it

  Set the WP_Query arguments */

$args = array(

'post_type'              => array( 'project' ),

'order'                  => 'ASC',

'orderby'                => 'title',

);


/* The Query */

$query = new WP_Query( $args );.
with Lumberjack...
… and here is how to do the same thing with Lumberjack:
/* The Lumberjack way */


use App\PostTypes\Project;


$projects = Project::builder()->get();


dump($projects);


/* THE OUTPUT

    Collection {

        #items: array:2 [

            0 => App\PostTypes\Project,

            1 => App\PostTypes\Project,

        ]

    }

*/
Built-in builder() method
First, you’ll notice we didn’t use an associative array to define the query parameters. This is because we are using some very reasonable defaults. Remember the custom post type class we created before. Well, because it extends the Post class, it comes built-in with a builder() method that does the most common kind of query — list a post type (in this case, itself) alphabetically by title. Very smart.
But what if we want to customize the query even further? Well, Lumberjack’s query builder has a set of chainable methods that you can use to extend your query in common ways.
The example below will sort alphabetically by title, exclude post ID 167, and limit the output to the first three items:
use App\PostTypes\Project


$projects = Project::builder()

    ->orderBy('title', 'asc')

    ->exclude(167)

    ->limit(3)

    ->get();;
Querying multiple post types
You can also query multiple post types by creating a generic QueryBuilder object like so:
use App\PostTypes\News

use App\PostTypes\Event;

use Rareloop\Lumberjack\QueryBuilder;


$posts = (new QueryBuilder)->wherePostType([

    News::getPostType(),

    Event::getPostType(),

])

->orderBy('date', 'asc')

->get();;
Scoped queries
On top of this, you can create “scoped queries,” which are defined in a post type’s class and can be extended as needed. This can be useful if you find yourself creating multiple queries with the same base parameters.
A scoped query looks like this:
namespace App\PostTypes


use Rareloop\Lumberjack\Post as LumberjackPost;


class Post extends LumberjackPost

{
    ...

    public function scopeFeatured($query)

    {

        $featuredPostIds = [1, 2];

        return $query->whereIdIn($featuredPostIds);

    }

}


/* page.php */

/* Get the latest 3 featured posts */

$posts = Post::featured()

    ->orderBy('date', 'desc')

    ->limit(3)

    ->get();
Lumberjack makes it easier to register menus
Registering menus
Just like registering post types, registering menus the traditional way is not difficult. But Lumberjack removes one more hurdle, one more thing to think about. Menus are now a part of configuration.
All you have to do is add a menu machine name and label to an array in the menu config, and you are done. Here is how it looks:
 [

        'main-nav' => __('Main Navigation'),

        'footer' => __('Footer Navigation')

    ],

];
...and more!
This barely scratches the surface of what Lumberjack can do. I’d encourage you to read the documentation to see all of the features it offers and learn more about how it works.
ACFBuilder
Advanced Custom Fields Pro is the plugin of choice for adding custom fields to your WordPress project. It is unmatched in its breadth of functionality, longevity, and documentation. However, Advanced Custom Fields (ACF) lacks serious support for configuring fields in PHP code. It is possible to do it, ACF’s website shows you how. There is even a PHP export option in the ACF user interface. But for modern developers, this is not good enough.
This is where ACFBuilder comes in.
What is ACFBuilder?
At its core, ACFBuilder is an ACF configuration generation library. It allows developers to configure ACF fields using expressive, chainable methods that make it easy to work with ACF in code. Its syntax makes your code more readable while at the same time providing built-in documentation through autosuggestions and other intellisense features offered by any standard IDE. It also provides sane default values for common settings, so you have less code to write most of the time.
Here is a look at the traditional way to register a field group in ACF:
 'group_1',

    'title' => 'My Group',

    'fields' => array (

        array (

            'key' => 'field_summary',

            'label' => 'Summary',

            'name' => 'Summary',

            'type' => 'textarea',

        ),

        array (

            'key' => 'field_categories',

            'label' => 'Categories',

            'name' => 'categories',

            'type' => 'checkbox',

            'width' => '33%',

            'choices' => array (

                array (

                    'faculty_staff' => 'Faculty & Staff',

                    'community_impact' => 'Community Impact',

                    'professional_development' => 'Professional Development',

                )

            )

        )

    ),

    'location' => array (

        array (

            array (

                'param' => 'post_type',

                'operator' => '==',

                'value' => 'post',

            ),

        ),

    ),

    'menu_order' => 0,

    'position' => 'normal',

    'style' => 'default',

    'label_placement' => 'top',

    'instruction_placement' => 'label',

]);
Field group code
This is very difficult to work with. In order to create this code, you have to either create your fields in the ACF user interface and then export it or pore over documentation on the syntax while writing your code.
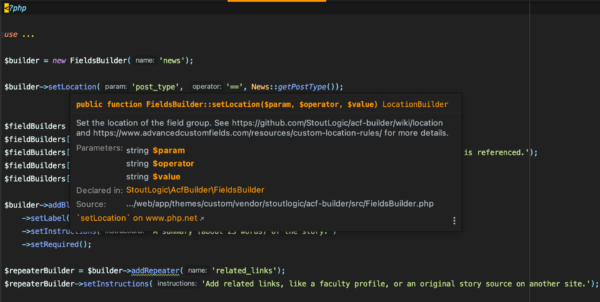
With ACFBuilder your field group code looks something like this:
setLocation('post_type', '==', News::getPostType());

$builder->addRichText('summary')

    ->setLabel('Summary')

    ->setInstructions('A summary (about 25 words) of the article.')

    ->setRequired();

$builder->addCheckbox('categories')

    ->addChoice('Faculty & Staff')

    ->addChoice('Community Impact')

    ->addChoice('Professional Development')

    ->setWidth('33%')

    ->setInstructions('Select all categories that apply.');


return $builder;
Easier to read and plays nicely with others
Notice how much easier it is to read. The code is more succinct but it also uses methods that offer meaning as to what they are.
Also, because ACFBuilder is well-written, object-oriented code, it plays very nicely with intellisense features of most IDEs. When defining fields we can start typing method names and get a suggestion of all of the many methods available to our object.
We also get built-in documentation, as you can see below:
Summary
The challenge was to bring some modern development best practices to the aging WordPress CMS while at the same time building a better codebase that has the hallmarks of a maintainable, easy to change application.
By implementing a few developer-centric frameworks, we can write more code that works with the powerful features of our IDE, is easier to read, is more reusable, and is just more enjoyable to work with.